FINN Example FPGA Flow Using MNIST Numerals
This example demonstrates how to bring a FINN compiled model into the Vivado FPGA design environment for integration into a larger FPGA application. It extends on the command-line build_dataflow using a model that was quantized with Brevitas down to single-bit weight/ativation precision to classify hand-written numerals from the MNIST data set.
If you are new to the command-line flow, more information can be found here.
This demo was created using Vivado 2020.1.
Compiling the Model in FINN
Configuration
build.py assembles the needed files and configures how the model is compiled when generating the "stitched IP". The following items will need to be set appropriately for specific use cases:
-
output_dir: defines the directory to be created for FINN compiler output. -
target_fps: desired throughput performance target for FINN compiler to achieve. -
mvau_wwidth_max: an optional parameter (described here) shown only to illustrate passing additional configuration items to the compiler. -
folding_config_file: an optional parameter to pass a json file defining the layer optimizations (PE,SIMD,ramstyle, etc.) to the compiler. -
synth_clk_period_ns: set the desired clock period in nS. -
fpga_partconfigures the IP for your target device that the stitched IP will be implemented in. It should be the full string recognized in Vivado: <device>-<package>-<temperature_grade>-<speed_grade> -
generate_outputs: for integration purposes, the only output needed isSTITCHED_IP. You might also find theESTIMATE_REPORTSinteresting. Other options are documented here and some of them (namely OOC_SYNTH, BITFILE) add substantial runtime and are not needed for this flow. -
stitched_ip_gen_dcp: will generate an IP block with a synthesized design checkpoint (.dcp) which makes the design more portable across different machines, but will add some runtime.
Running FINN Compiler
Prior to running, insure the following prerequisites have been met:
- Install FINN and prerequisites. The Getting Started section of the FINN documentation might be helpful for this.
- Ensure you have the
FINN_XILINX_PATHandFINN_XILINX_VERSIONenv variables set appropriately for your install. For example:
export FINN_XILINX_PATH=/opt/Xilinx export FINN_XILINX_VERSION=2020.1
- Set the env variable for your
finninstall top directory (where you cloned the FINN compiler repo):
export FINN_ROOT=/home/foo/finn
Then, change to finn install directory and invoke the build as follows:
cd ${FINN_ROOT} ./run-docker.sh build_custom ${FINN_ROOT}/tutorials/fpga_flow/
Alternatively, since the tutorials folder is already part of the FINN compiler installation, you can invoke it from within the Docker container:
cd ${FINN_ROOT} ./run-docker.sh cd tutorials/fpga_flow python build.py
The build should finish in about 10 minutes, and the FINN docker will close on success.
   ...
   Running step: step_create_stitched_ip [11/16]
   Running step: step_measure_rtlsim_performance [12/16]
   Running step: step_out_of_context_synthesis [13/16]
   Running step: step_synthesize_bitfile [14/16]
   Running step: step_make_pynq_driver [15/16]
   Running step: step_deployment_package [16/16]
   Completed successfully
   The program finished and will be restarted
Examine the Stitched IP
Navigate to the stitched IP project directory:
cd ${FINN_ROOT}/tutorials/fpga_flow/output_tfc_w0a1_fpga/stitched_ip
And, open the project:
vivado finn_vivado_stitch_proj.xpr
Explore the IPI board design and note the interfaces. Keep this design open in Vivado, as we'll be adding the testbench and invoking the simulation here later on.
Simulating the Stitched IP with a Verilog Test Bench
The included testbench.sv is a very simple test to illustrate how to feed data to the compiled model.
The image data is 784 bytes per frame, organized as 28x28 unsigned integer bytes. However, due to the folding optimizations chosen, the input data is transfered to the hardware model 49 bytes at a time over 16 cycles. Note how this matches PE=49 as selected for the first layer in folding_config.json
Using the following image for coordinate reference where a byte is identified as B<row>_<column> we see that B0_0 is the upper leftmost byte, and B27_27 is the lower right most byte:
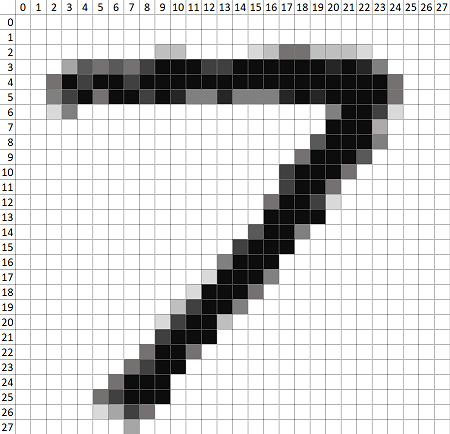
Thus, the input data for the first cycle is organized as such:
s_axis_0_tdata[391:0] = {B1_20,B1_19, ... ,B1_0,B0_27, ... ,B0_1,B0_0};The testbench reads data from a simple text file (data.hex). The included script gen_tb_data.py creates the test data as well as the ground truth expectations (Note: using ground truth is undesirable if the intent is to validate that the HW implementation matches the trained model). The script takes the liberty of flipping the byte-order such that verilog's $readmemh brings B0_0 nicely into the LSB position.
To generate the test data, you'll need a Python environment with Keras installed since the Python script uses keras.datasets to access the MNIST data. Once you have this, you can generate the test data with the following.
cd ${FINN_ROOT}/tutorials/fpga_flow/output_tfc_w0a1_fpga/stitched_ip mkdir -p finn_vivado_stitch_proj.sim/sim_1/behav/xsim python ../../gen_tb_data.py finn_vivado_stitch_proj.sim/sim_1/behav/xsim/data.hex
If you'd like to, you can examine what the generated .hex file with the test data looks like:
less finn_vivado_stitch_proj.sim/sim_1/behav/xsim/data.hex
In Vivado, add the testbench as a simulation file by pasting the following into the Tcl Console:
add_files -fileset sim_1 -norecurse ../../testbench.sv
Then, run the simulation (Flow Navigator -> Simulation -> Run Simulation). Give the simulator a run -all (click the "play" button in the simulator) to run the sim to its $finish conclusion. With 20 test points run, it should have 1 mismatch due using the ground-truth as the check source:
 ************************************************************
  SIM COMPLETE
   Validated 20 data points
   Total error count: ====>  1  <====
Note that this mismatch is due to the trained neural network not having perfect accuracy on the test dataset (i.e. the trained PyTorch model would have the same behavior).
Instantiation in Mission Design
There are any number of ways to bring the stitched IP into larger design.
FINN already packages the stitched IP block design as a standalone IP-XACT component, which you can find under ${FINN_ROOT}/tutorials/fpga_flow/output_tfc_w0a1_fpga/stitched_ip/ip. You can add this to the list of IP repos and use it in your own Vivado designs. A good reference for this is UG1119
Keep in mind that all of the User IP Repo's included in the Stitched IP project (from $FINN_HOST_BUILD_DIR which is normally located under /tmp/finn_dev_<username>) need to also be brought in as IP Repo's to any project using the stitched IP. It would be prudent to copy those IP repos to an appropriate archive location. Alternatively, if you don't want to copy all of the dependencies, you can ask FINN to generate the IP-XACT component with a synthesized .dcp checkpoint by passing the stitched_ip_gen_dcp=True option as part of the build configuration.